Tuesday, 8 October 2013

Rebel Hoth System Defence 'Blizzard' Squadron

 this time for myself to use in my store games! 


The Guild Rebel Alliance squadron of ships includes two X-wings escorting the HWK-290, backed up by the hefty payload of a B-Wing and the customised YT-1300 'Shady Lady' Freighter.


The unique YT-1300 'Shady Lady' has been modified and given an intensive paintjob to mark her out alongside the repainted squadron fighters.


Customised YT-1300 'Shady Lady'. The cockpit and tunnel have been carefully modified/removed. Remoulding parts of the ship and then extensive weathering techniques layered create this rusty, battered look, befitting the extreme conditions of Hoth.


Custom painted X-wings, HWK-290 and B-Wing comprise the 'Blizzard' Squadron fighter wing. After stripping the original paint jobs the ships were resprayed and smoothly blending up adding engine grime, fuel streaking, panel lining and highlighting, exhaust glow, rust effects and Rebel insignia


Well, more stuff to come soon! :)

Monday, 6 May 2013

Boomslang: Infinity Cutter TAG

Finished pics. (click image, then right click and open image in in new tab for larger views)


Super Jurassic Dungeon Assault Team Explore


One day, we'll sort out some proper house rules for tanks and dinosaurs.

Sunday, 5 May 2013

Chaplain Dreadnought WIP 3

Another update on how the lanky rust bucket is progressing in between other projects I'm knee deep in.
Decided to redo the left claw - the blood effect needs redoing, (I have some new tamiya clear red in the mail from ebay)..
Made a couple of little magnetized options for under the sarcophagus; a targetter, another couple of guns including a flamer on a servo arm..kinda looks cool giving a dread extra lil arms for things). IDK just fun stuff to make it look unique and different. Lots more rusty effects added to the left arm now and some started on the right arm. I have some forgeworld aircraft cannons arriving soon (this week hopefully). I'm looking forward to riggin up a right arm for them to be mounted on.


cheers =]

Saturday, 4 May 2013

Predator Bust - repaint WIP

Pallisades Predator Unmasked micro bust, stripped, prepped, halfway through repainting.


'If it bleeds, we can kill it..'

Here's an earlier shot where I worked on basic flesh tones. I did some photomanips at this stage to decide on eye colours and also messed around with the teeth as they are pretty chunky on the model originally. Since this was taken, I have now removed the resin tusks and replaced them with metal ones - they are slender now and tougher - seemed a better idea for model lifespan..


Friday, 3 May 2013

Chaplain Dreadnought WIP 2

A quick update of how he is progressing. A lot of the lower limb rust and mechanical weathering is coming along, some macabre blood/ichor on the power claw and other magnetized optional bits starting to assemble. I had a chat and a coffee with a friend earlier and he approved of the colour choices so far. He's got a strong academic/artistic understanding of colour theory so it was good to get some valuable feedback on certain things, suggestions I could try out in the later stages etc.


Back to the chapter crypt he goes until tomorrow.

Thursday, 2 May 2013

Rusty stuff.

Here's a few WIP shots of the rust and weathering work as it progresses.
It's always a fun process and as it develops and the effects begin to happen across the surface of the model. I find it very relaxing and it does offer creative opportunities; some violet reflections here and there, spots and patches of blue hues and greens that contrast visually with the oranges and warmer tones of the rust colours.


More stuff soon!

Chaplain Dreadnought WIP

Time to add something else to the Crusade.

 This chap is a great sculpt to paint. It's the chaplain dreadnought I purchased many moons ago and I finally finished off all the conversions I wanted. He has longer legs so he looks like he can walk faster than a snail now, longer melta barrels, finer banded hosing, torso/waist relocation forward under the ribcage as it should be! - and a plethora of filling jobs required, plus added iconography and magnetising the torso and limbs.
He stands about 11-12mm higher than a originally/regular dread and hopefully will look more in scale with the FW Contemptor Talon 3-pack I plan on one day owning.
The original iron halo in this kit was used on the gunship, it fitted on top of the air intake scoop perfectly --but only because I have a much nicer once that suits this model.
I will add that chunk of brutal blades above the carapace towards the final painting stages.
He also has a banner/relic blade to go on top behind the halo.

So here's a WIP shot of the fella.


More stuff soon!

Monday, 29 April 2013

Black (and red) Knights - Gaming Standard

Another unit to add to the ever expanding hordes of Castle Ravenstein. Still working on the army fluff for this regiment. I went for a uniform look to the unit and whizzed through them in a week in my spare time. I like the way they came out but I will try a different style when I build hexwraiths for my next cavalry block, more ethereal and less rusty'n'dusty (which is my overall army aesthetic).
The only little conversion was on the Hell Knights steed - he has some devilish horns to set him apart from the other mounts.


More creepy stuff soon!

Necrarch Vampire WIP

Here's the next member of the Ravenstein household, well under way now and hopefully finished some time this week (aside from the mountain of other projects on the go, I need this mini for a local campaign..)


A few conversions here and there and he has a magic sword (won a free treasure: Initiative 10 item in last months campaign..not really useful for a vamp but hey ho, beggars can't be choosers!)

Black Knights to follow soon!

Sunday, 21 April 2013

Art of War - Painting Group

Well, a very busy gaming weekend indeed! Huge adventuring night with close friends and some of Sodapops Super Dungeon Explore (I almost took the party out this week, only that @#*$%£ Riftling Rogue and her cursed Teleporting shenanigans! Foiled again! but great fun had by all )

So, in other gaming/painting related news, the main painting group on facebook that I admin ran into some IP ambiguities recently, regarding the group name 'Really 'Eavy Metal'. This group was one I inherited for admin duties and was not named by me at it's inception. However recent events and emails made it clear that using GW trademarks on 3rd party site titles was confusing for people, flew in the face of GW legal and tbh completely understandable. As a result, and to just end the ongoing debates and nonsense surrounding the whole thing, the group name is now 'Art of War - Painting Group'.

https://www.facebook.com/groups/Artofwarpainting/

If you follow this blog but have not joined go and apply now! It is a great place to share ideas and efforts with other painters and modellers. The group is non commercial so please bear in mind that posts that advertise services or products blatantly will be removed and membership reviewed.

Enjoy your Hobby!

Friday, 19 April 2013

Varghulf WIP skull sculpting - final work

The Varghulf skull is now pretty much complete at the skull sculpting stage.


The feet claws are also working out and almost ready. After all these stages reach finalization I can begin work on the fur texturing and in the process create a simple tutorial to follow if you wish to use the same technique.

Moar creepy stuff soon!

Thursday, 18 April 2013

Torbay Guild of Gamers


Exciting times ahead as plans to start a local gaming guild are now starting to reach fruition.
A venue has been allocated (keys in hand!) and some prospective members have been given a walkaround the modest venue location. First impressions were great from the guys and the place has toilets, a place to store tables and scenery, and it is also well lit and the shop window can easily be draped to offer members some privacy during gaming nights. It is situated @ Attika in Abbey Road, Torbay, right next to Carters and the cinema. There will be no official 'closing time' on gaming nights and extra nights can be booked for local gamers that cannot make it on the usual club night.

Flexibility is the key I believe as not everyone can always make it on a regular weekly night, so the option to use the venue on other evenings and also weekends is fantastic! Over the course of the next week tables and gaming boards will be resourced and hopefully the guild can start doing what we do best - gaming - in the very near future.

The club will be Gaming Club Network registered, with all committee members CRB checked and cleared in advance of any club membership allocations. This also means that Games Workshop can officially help support the club at the local GW store and help gather more members, even help provide terrain and tables for wargaming.

Hopefully, The Torbay Guild of Gamers is here to stay, finally!

Wednesday, 17 April 2013

Dental Work

Had a stab at carving the lower jaw from resin and also started on the dental work for the Varghulf. There will be more skin/tendons on the skull at a later date but for now the fangs need to settle solidly into the jawbones, which gives me an opportunity to work on the other end of the model, the feet/claws.


Hope to get some of the footwork done later tonight.

Moar creepy stuff soon.


Tuesday, 16 April 2013

Varghulf WIP Sculpt Stage

Work slowly progressing on the Varghulf custom sculpt/build. At this stage I refer to lots of imagery online, and my doodle sketches of ideas before the project began becoming 3D. It's still not into definiton stages yet but more fleshing out done, working on pose, balance, basing and starting to create the upper head. Lower jaw will be sculpted seperately then added and blended in. There is still fur to add (a good opportunity to do that tutorial at the same time!)


Here are a few development shots so far: The right foot stump is magnetised as is the branch, the left foot has a long pin for locating the tree perch lug.. This makes for a very delicate looking but extremely strong mounting for the model - still with enough 'give' to allow the model some flex if knocked by accident and not shear from it's mounting.The model therefore has small contact points to it's 50mm stand adding to the sense of balance and weight when the armature is placed into the tree stand. Both legs are obviously reinforced with steel and also some simple paper tissue/cyanoacrylate 'fibreglass' at this stage. it's rock solid and very strong stuff.


 More creepy stuff soon!


Saturday, 13 April 2013

Black Widow

Here is a few snaps of a mini I had fun painting up. Manufactured by Statuesque Miniatures. She has the coolest pose!


I chose the colour scheme of course to suit the figurine - I think she looks very similar to Natasha Romanoff from the Avengers! So.. I hope to use her in some games, perhaps shooting zombies in the head or fighting gangers in the Underhive, or maybe as a bounty hunter/merc for Infinity.

Thanks for looking! =)

Friday, 12 April 2013

Tzeentch Chimera - Gaming Standard

Here is a Warhammer monster I banged out in a night for my good friend who is manager at the local GW store. Lots of fun, was allowed to go colour crazy and only did one lil conversion, added the horns on the middle dragon head....because you can never have enough spikey bits on a chaos critter!


It's gaming standard paintwork for the current store battle campaign. I hope he likes it!

Moar stuff soon!


Wednesday, 10 April 2013

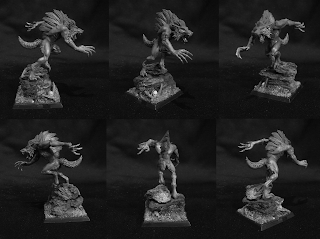
Werewolf Project WIP: Kessler, stage 2

Well, he's starting to reach completion at the final sculpt stages, just a few little tweaks to make here and there. He now has 4 toed feet/claws and the first armband/torc. I'm still waiting on extra bits I need to arrive. I think he's a got a lot character, stood atop the lair rocks sniffing the breeze for prey..


More work in progress shots of his pack brothers soon!

Monday, 8 April 2013

Werewolf Crypt Horror WIP 3

Last one of the Crypt Horror Werewolf conversions. This is the champion crypt haunter, Skorzeny .


All the werewolves are being left to cure for a few days, then the final work of sculpting the accessories and accouterments will commence. I am deciding on placement of basing options/environmental details and checking out some different 'warrior' type armbands and torcs, amulets etc online for inspiration. I will most likely incorporate the wolf skulls from the space wolf range (ditching any nordic runes.. these are old Sylvanian lycanthropes, not the were-beasts of the northern realms.)
I really wanted a 'crinos' form similar to Forgeworld Skinwolves. The Skinwolves are meh..okay models but they look too Doberman. It would have been cheaper and easier to just go for the FW stuff (wow never thought I would say that LOL), these conversions are not cheap to do, working out at a basic £44 for the components before adding cost of putty and other materials. On the flip side, these are pretty solid, rugged models.
I hope they are as solid and rugged on the battlefields..
I'm looking forward to painting these.

More creepy things soon!

Werewolf Crypt Horror WIP 2

Next one for the pack is Talbot. He's done very bad things.


Again this is the basic fur done to hide the seams, some repositioning here and there. Very fun models to work with. Finer details like the musculature definition, toe claws will be done when the fur has cured completely, some ornamental bits, jewellery/totemic items etc.

Werewolf Crypt Horror WIP 1

I have been resculping crypt horror/vargeist kits this weekend to give me Werewolves/Lycans for my Sylvanian army. I used Fenrisian wolf heads, crypt horror arms and vargeist backs. Still lots more to do but I'm happy with the fur so far. The bases will be a bone strewn rocky lair.

 I will get photos of the other 2 when they reach this stage of resculpt, but they are almost ready for the tiny details..This first one is called 'Kessler'.


I have yet to add arm torcs and other accessories. Colour scheme will most likely match my direwolf pack, but that is a long way off.


More creepy things soon!

Friday, 5 April 2013

Cutter T.A.G WIP Part 2

Started on more details, more glazing and got some base building done.
I am trying to create a wild jungle clearing vibe, with a deadfall log the TAG is stepping over cautiously, creeper vines across the leaf littered jungle floor and a few exotic plants to add to the atmosphere.


I will have a chat with my friend and work out what (if any) lettering, names, numbers or other malarky he wants on it.
I kinda think 'BOOMSLANG' on it somewhere would look cool. It's the name of a jungle snake. 

Or simply 'Boomer'..

Other slogans perhaps: 
'Born to Chill'
'Apostasy NOW!'
"Yu Jing Don't Surf!"


Moar soon...

Thursday, 4 April 2013

Pre-Heresy Rhino Detachment

Something a little different today to blog about but exciting nonetheless to die-hard 40k fanatics (and fellow old school miniature collectors) especially those interested in Pre-Heresy re-enactments...


I was fortunate enough to stumble across and purchase one of the vintage Citadel  RTB04 Rhino troop transports box sets. The God-Emperor indeed smiles upon me!


There is next to no plastic flash or any miscast pieces so they should be a breeze to construct.
The sprues look to be in mint condition, missing only one smoke launcher, the tip of one exhaust, and 3 of the headlamps (easily replaced by taking Instant Molds from the other sprues).
Suprisingly, the notoriously fragile and delicate hand rails are ALL intact!
Unfortunately, the schematics poster and Imperial Vehicle Decal Sheet is absent.


The box itself is worn and battered with age, the kit having been released 25 years ago.. gosh this makes me feel old! I recall seeing the adverts in the latest White Dwarf as a child and wishing I earned more from my pocket money chores. I guess all good things (sometimes) come to those who wait!

This will be a splendid addition to my 'old knights of the Imperium' aesthetic for my steadily expanding  Black Templar crusade (see my previous posts for photos).

My motor pool has just increased significantly.. now I must find time to lavish attention on these fantastic old model kits.


Imperator Vult!

Wednesday, 3 April 2013

Undead Battle Standard WIP 3

Undead Battle Standard WIP 3

I wanted something different for my standard bearer icon in the skeleton warrior core unit, something that would be unique, eyecatching but also narrative for my army.
 I decided to go for a carrion bird skull, after all, Ravenstein is my Vampire Bloodline name. 


There's a connection there - plus I really like the skull shapes. A good friend of mine also painted a fantastic picture a while ago with a character having an oversize crow/raven skull for a head (wearing a top hat) and I think the imagery has stuck in my mind. Well, maybe not the top hat.. but the skull is something I wanted to have a go at one day. 

So after a deliberation over bits to use I decided to just go ahead and sculpt my own. I wanted something sturdy and I really prefer carving solid resin than making greenstuff bits all the time for minis. Resin carving is very easy to do and (thanks to forgeworlds generosity) I have plenty of chunks of useless resin laying around to experiment with. 

It's very fast, I only need 3 tools: A scalpel blade, a pinvice hobby drill and a small emery board for sanding (although most smoothing can be done with the edge of a scalpel scraping gently.) I decided to go a little oversize so as I carved it down I still had plenty to play with. I also wanted the skull to stand out visually so I decided on measurements and then using a pair of chunky snips I tore off a chunk of resin to begin the process.


Next I just roughly chopped it to bird skully shape.. No need for precision just yet.


Next step was to drill out some guide holes for eye socket carving. 
I went right through the side of the skull so I can better judge either side and socket positions were equal.. in theory!


I used the scalpel to start to define the main skull structure lines and contours.
Having a picture for reference here helps, so I borwsed many different photos of carrion bird skulls for inspiration and direction whilst carving away gently at the resin.


Next step was to work on the nasal cavity. Using a pinvice drill I again went through the skull at the rear/back of the beak on the top either side.


These little guide holes were then widened lengthwise along the ridge of the beak.


More scraping, shaping and definition added at this stage.


Starting to polish the shapes and tidy up.


Working on the symmetry..getting there almost..


Very fine polishing work and final definitions.


As this is a fiddly little piece I decided to magnetise it so it can be easily removed from the banner if required.. Totally unnecessary but I know some clumsy gamers and would rather it didn't need gluing on every time it gets sent across the battlefield by errant sleeves etc.


So this is the beaky icon..


And magnetised to the banner bearer..


It's simple and I hope effective.. just need to give it some paint..and perhaps that tophat ...

More creepy things soon!